As a system-level security measure, Windows includes Data Execution Prevention (DEP). DEP’s primary function is to defend against harmful code attacks by shutting down any app that fails to run correctly in memory.
A different set of hardware and software technologies prevents malicious code from running, known as executable space protection.
DEP is labeled as non-executable. Any harmful software attempting to execute code in specific system memory locations intended for permitted programs and Windows throws an error.
Furthermore, all of this is done to keep viruses and other security dangers from harming your computer. On the other hand, DEP may interfere with legitimate programs such as your antivirus, in which case you may have to disable the feature for individual apps.
How Data Execution Prevention in Windows Works
To protect your apps against malicious code vulnerabilities, you should use DEP with your existing security tools, not as a stand-alone solution.
There are reserved memory sections in many operating systems where vital programs and processes work. To avoid a buffer overflow, this memory space must use carefully. Otherwise, malicious code may get in, consuming too much space.
If this occurs, users or programs that shouldn’t have access to that data may be able to get their hands on it.
DEP kicks in to counter such access or execution by any executable programs that cannot load in the system memory locations. The functionality raises an error instantly when it finds suspicious code loading and prevents it from running.
Moreover, the disadvantage with DEP is that it may identify older non-Microsoft programs that rely on Windows Services. You can turn off DEP or make an exception in your system’s settings to execute these programs.
Note: In some cases, obsolete device drivers are the root cause of DEP issues.
Types of Data Execution Prevention – Windows 10
There are two different techniques of creating DEP:
- Hardware-based DEP
- Software-based DEP
Hardware-based DEP
When suspicious code is detected running from memory regions as non-executable, a hardware-based DEP intercepts it and throws an exception to stop any system threats. The only exception is if the code is in a certain location.
Additionally, Hardware-based DEP based on processor hardware prevents code from running from specific memory locations.
The following prerequisites must complete before hardware-based DEP can use:
- The processor on your computer needs to be able to handle hardware-based DEP. Processor architectures like AMD and Intel, whose Windows-compatible designs are also DEP-compatible, have different DEP hardware implementations.
- Make sure that hardware-based DEP is enabled in your BIOS.
- Furthermore, Windows Server 2003 with Service Pack 1 or Windows XP with Service Pack 2 must install on your PC.
- Enable your computer’s hardware-based DEP. Hardware-based DEP may be deactivated in 32-bit programs depending on your configuration, but it is always enabled for 64-bit built-in programs in 64-bit Windows.
Software-based DEP
Exception-handling procedures in Windows can be circumvented using software-based DEP security checks.
Any processor capable of running Windows XP Service Pack 2 can use this sort of DEP, regardless of the CPU’s hardware-based DEP capabilities. This DEP protects only limited system binaries.
How to Know if DEP Is Active on Windows 10 PC
Well, you can check the DEP status on your PC system by using the following steps:
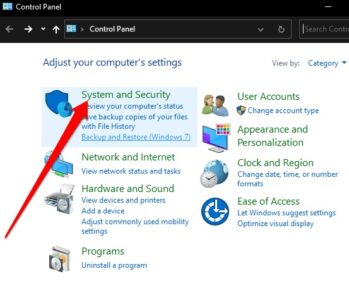
1. Open Control Panel and choose System and Security.
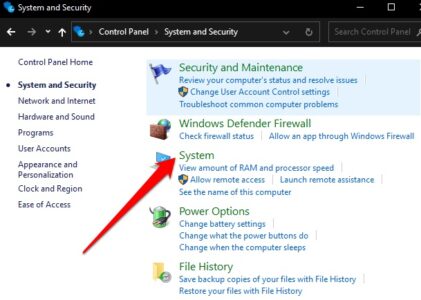
2. Now, choose System.
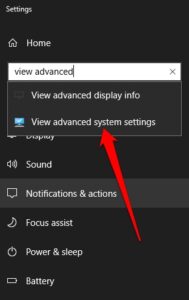
3. Afterward, type View Advanced System Settings in the search bar.
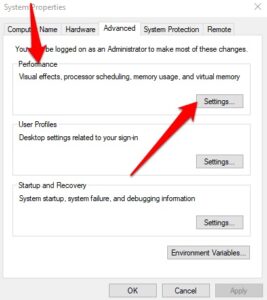
4. In the System settings pop-up, choose Settings under the Performance section.
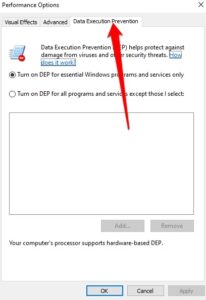
5. Choose the Data Execution Prevention tab to open DEP settings.
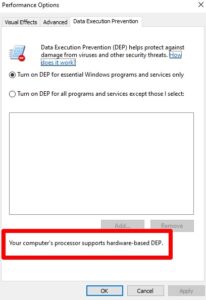
6. You will see your current DEP status on your system & whether or not your computer’s processor supports hardware-based DEP.
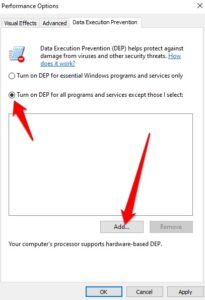
7. If necessary, you can make exceptions to DEP, but this should only be done if you have no other choice. Click Add after selecting Turn on DEP for all apps and services except those I choose to include exceptions. It would assist if you restarted your computer to have the modifications take effect.
Note: 32-bit programs cause most conflicts, and you can not exclude 64-bit programs from DEP.
Enable or Disable DEP in Windows 10
Windows 10 allows you to disable data execution prevention windows 10 to make exceptions or adjustments unique to the use of specific apps on Windows 10. However, even if it’s not encouraged, the only way to do it at this moment is to use the command line.
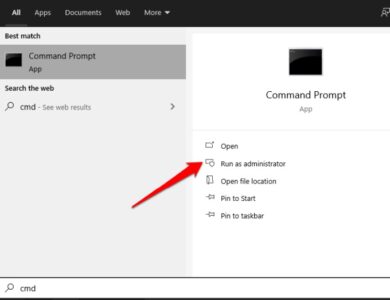
1. Open the command prompt menu by selecting Start and typing CMD. Next, open an elevated command prompt by selecting Run as Administrator.
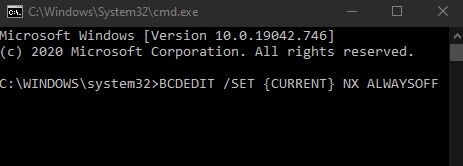
2. In the Command Prompt window, enter this command: BCDEDIT /SET {CURRENT} NX ALWAYSOFF and press Enter. Once your computer has restarted, the modification will take effect. To disable DEP with this command, you may need to change a BIOS option.
A word of caution: Before disabling DEP in an app you know and trust, make sure the publisher offers a DEP-compatible version or updates. The DEP-compliant version or update should install and activate so that you can reap the benefits of DEP’s security. To protect your system, you should not disable DEP. Otherwise, an attack on your system could extend to other files and apps.
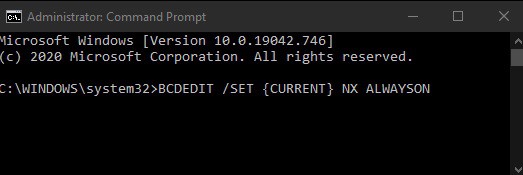
3. To enable DEP again, open an elevated command prompt & enter this command: BCDEDIT /SET {CURRENT} NX ALWAYSON. Now, restart your PC for the changes to take effect.
Final Words
Data Execution Prevention is a valuable feature, but all software and hardware don’t support it. Because of this, some Windows programs may encounter difficulties and error warnings while working with DEP.
ALSO SEE: PDF Writer and Printer
Furthermore, on the other hand, DEP is one of the most basic Windows-based security measures. Therefore, it’s best to leave DEP on by default unless there’s a compelling reason to disable it.


